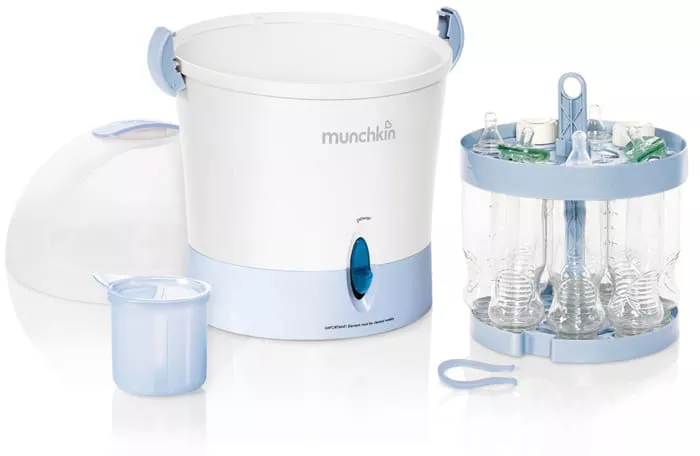
Using a Munchkin sterilizer is an effective way to ensure that your baby’s feeding items are clean and safe. This article will guide you through the process of using a Munchkin sterilizer, including how to prepare items for sterilization, the sterilization process itself, and how to maintain your sterilizer.
The Munchkin sterilizer is designed for convenience. It is easy to use and can sterilize bottles, pacifiers, and other baby items quickly. Understanding how to use it properly will help you maintain your baby’s health.
Preparing the Items for Sterilization
Before you begin sterilizing, you need to prepare the items. First, wash all bottles, nipples, and accessories with hot, soapy water. A bottle brush can help remove any milk residue. Rinse the items thoroughly under running water to ensure no soap remains.
Next, check the items for any damages. Cracks or chips in bottles or nipples can harbor bacteria. If you notice any damage, replace the item before sterilizing.
After washing and rinsing, place the items upside down on a clean towel. Allow them to air dry completely. This step is important because any leftover water can dilute the sterilization process.
Loading the Munchkin Sterilizer
Once the items are clean and dry, it’s time to load the Munchkin sterilizer. Start by opening the lid of the sterilizer. Place the bottles, nipples, and other accessories in the sterilizer basket.
Make sure to arrange the items in a way that allows steam to circulate freely. Avoid overloading the sterilizer, as this can prevent proper sterilization.
If you have smaller items, like pacifiers, you can place them in the designated section. Ensure that everything is securely positioned and that no items are blocking the vents.
Adding Water to the Sterilizer
After loading the sterilizer, it’s time to add water. The Munchkin sterilizer typically requires a specific amount of water for effective sterilization. Refer to the instructions that come with your sterilizer for the exact amount.
Most models require about 5 ounces (150 ml) of water. Pour the water into the designated area at the bottom of the sterilizer. Make sure to use clean, filtered water if possible. This can enhance the sterilization process.
Starting the Sterilization Process
Once the water is added and the items are loaded, close the lid of the sterilizer. Ensure that it is securely closed.
Next, plug in the sterilizer to an electrical outlet. Depending on your model, there may be different settings for sterilization. Most Munchkin sterilizers have a simple one-button operation. Press the button to start the sterilization cycle.
The sterilization process usually takes about 5 to 8 minutes. During this time, the sterilizer will generate steam, which kills germs and bacteria. It’s important not to open the lid during the process, as this can release steam and interrupt the cycle.
Completing the Sterilization Cycle
After the sterilization cycle is complete, the sterilizer will typically shut off automatically. Some models may emit a beep or other signal to indicate the end of the cycle.
Once the cycle is complete, wait a few minutes before opening the lid. The steam inside will be very hot, and you want to avoid burns.
When you’re ready to remove the items, open the lid carefully. Use oven mitts or tongs to handle the sterilizer basket. This helps protect your hands from the hot steam.
Cooling and Drying the Sterilized Items
After removing the items, place them on a clean, dry towel or a drying rack. Allow them to cool completely. It’s best not to place sterilized items directly on surfaces that may not be clean.
Once cooled, check the items again to ensure they are dry. Any moisture left on the items can promote bacterial growth.
Storing the Sterilized Items
Once the items are dry and cool, you can store them. Keep the sterilized bottles, nipples, and accessories in a clean, dry place. A designated cabinet or shelf is ideal.
If you’re not using the items right away, consider sealing them in a clean container. This helps keep them sterile until you are ready to use them.
Maintaining Your Munchkin Sterilizer
To ensure your Munchkin sterilizer continues to work effectively, regular maintenance is important.
After each use, clean the sterilizer according to the manufacturer’s instructions. This usually involves wiping down the inside with a damp cloth.
Make sure to remove any leftover water and allow the sterilizer to dry completely before closing it. Regularly check for any signs of damage or wear. If you notice any issues, contact Munchkin customer service for assistance.
Conclusion
Using a Munchkin sterilizer is a straightforward process that can help keep your baby’s items clean and safe. By following the steps outlined in this article, you can ensure that your baby’s bottles, pacifiers, and other items are properly sterilized.
Remember to maintain your sterilizer regularly for optimal performance. A clean, effective sterilizer is an essential tool in maintaining your baby’s health and hygiene. With the right care, you can make feeding your baby a safe and enjoyable experience.
Related topics:


